Device can work with several temperature sensors of various types. Types of supported sensors depend on whether the device has interfaces for connection:
- 1-Wire interface allows to work with DS18S20, DS18B20, DS1820 sensors and any other sensors that support TouchMemory/Dallas protocol.
- Bluetooth interface allows to work with sensors of various protocols (details on working with Bluetooth sensors are described on the Bluetooth tab).
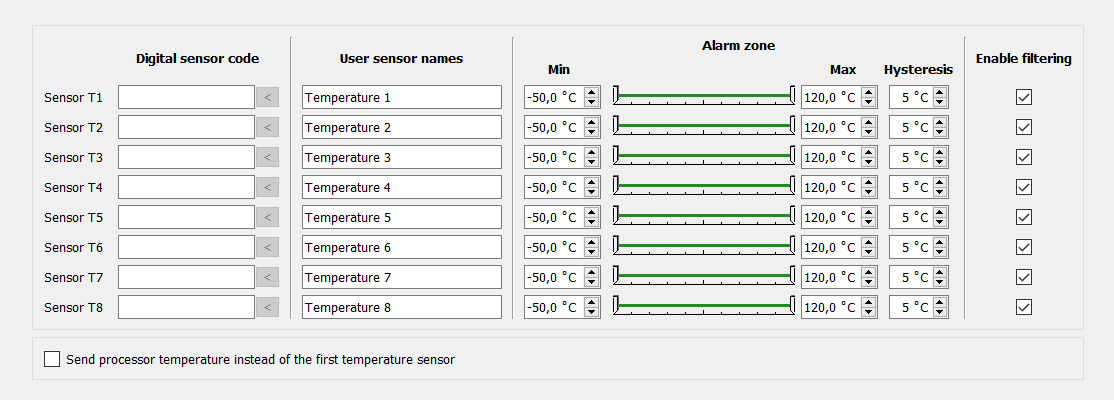
Example interface for configuration:

Digital sensor code - each wired sensor is a microchip, into which a unique identification number has been flashed at the factory, by which the device uniquely identifies this sensor in the 1-Wire network. This number is not indicated on the sensor body, therefore, before installing a network of such sensors, it is necessary to connect them strictly one by one to the corresponding contacts of the device. Observe polarity when connecting temperature sensors.
The hexadecimal address is read by pressing the corresponding < button in the temperature sensor settings window.
Device power must be turned on, since the sensors use 1-Wire bus power, and the voltage of the backup battery will not be enough for correct operation.
User sensor names - Each sensor can be given an original name for use in custom SMS messages. Sending SMS on temperature events can be configured on the tab Subscribers.
These names should not exceed 20 characters, and when they are specified, numbers, letters of the Latin and national alphabet can be used.
For the correct operation of the device, it is important not to use the?symbol.
¶ Alarm zone settings group
When going beyond the boundaries of Min and Max, the following events are generated:
- Temperature below threshold
- Temperature above threshold
- Temperature is normal
The minimum alarm zone range is 5oС.
Hysteresis - setting is necessary in order to get rid of false alarms when the temperature returns to normal. This is possible when the temperature value is on the Min or Max border.
For example, if
Hysteresis = 2,Max = 30, and the current temperature ist = 31, then to return to normal, you needtto be less than 28oC.
Enable filtering - if the checkbox is ticked, the device averages (smoothes out) readings from temperature sensors. If the checkbox is unticked, then the device displays the readings from the sensors without any processing.
Device can be configured to generate alerts when it goes out of a specified temperature range, as well as goes back into it. In addition, on these events, the device is able to activate and disactivate digital outputs. Using this function, you can organize the simplest thermal control by connecting the appropriate equipment to the outputs.
¶ Advanced settings
Fix the last temperature reading when communication with the sensor is lost - if the checkbox is ticked, then when the connection with the temperature sensor is lost, the device does not set an error code in the temperature value, but simply records the last reliable readings.
Send processor temperature instead of the first temperature sensor - if the checkbox is ticked, then the device sends the processor temperature value as the value of the first temperature sensor. By default, checkbox is unticked, which means that in this case the device transmits only the values from the first temperature sensor if it is connected via the 1-Wire interface.
Send processor temperature instead of the first temperature sensor settings is not available for devices that do not support this functionality.